What are strawberry fruit roll ups?
Get ready to embark on a journey to homemade sweetness with our Strawberry Fruit Roll-Up recipe! This delightful treat brings together the natural goodness of fresh strawberries, a hint of lemony zing, and just a touch of optional sweetness. Perfectly chewy, incredibly flavourful, and surprisingly easy to make, these Strawberry Fruit Roll-Ups are about to become your guilt-free indulgence. Fruit roll ups are a great way to feel like you’re eating sweets without actually eating gummy bears. They’re a great snacks whatever your age and make great lunchbox additions. I originally made these for my son as an after school treat…unfortunately I had eaten them all before he got home…whoops!
Are fruit roll ups healthy?
The best part about these fruit roll ups is that whilst they masquerade as sugar filled sweets, they’re actually pure dried fruit. They’re packed full of nutrients and of course are 1 of your 5 a day.
Let’s dive into the goodness that makes these Strawberry Fruit Roll-Ups a healthier alternative to commercial snacks. With fresh strawberries taking the lead, you’re indulging in a sweet treat that’s rich in:
- Vitamin C: Strawberries are a powerhouse of vitamin C, essential for immune support and skin health.
- Antioxidants: Packed with antioxidants, these roll-ups offer cellular protection and overall well-being.
- Low in Calories: This homemade version allows you to control the sweetener, making it a low-calorie candy option.
Do you have a diet restriction?
This is a great recipe for those with dietary restrictions such as:
- Vegan
- Vegetarian
- Gluten Free
- Dairy Free
- Nut Free
- Low FODMAP (if eaten in small portions)
- Low GI
.As the fruit roll ups are made by dehydrating fruit they should have a long shelf life when kept in an air tight container. If fruit has been properly dehydrated it should last several months, except these are so yummy that they’re always eaten within a day or two of being made in my house, even when I batch make them!
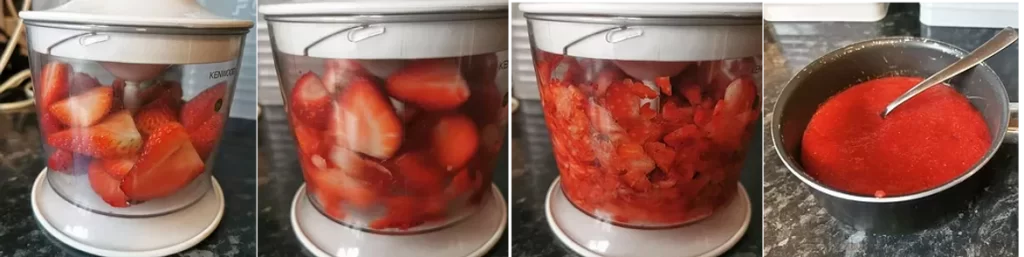
Step 1: Blend the strawberries
Firstly, blend up all of your strawberries until they’re a smooth liquid. If you would like to you can also strain out the seeds at this point although its not something I bother with as the seeds don’t bother me. Place your strawberry liquid into a small pan and heat, whilst stirring regularly, until your liquid has reached the thickness of a slightly runny jam. It needs to be thick enough to be able to spread it onto a baking sheet without it running off the sides. The more water you evaporate out at this point, the less time we will have to dehydrate them for.
Step 2: Dehydrate the strawberries
You don’t need a dehydrator for this recipe. The lowest temperature on your oven will work just as well. This is usually about 60 degrees Celsius. If you’re tempted to up the temperature as this could result in burnt fruit and that wouldn’t be good. Burnt fruit tastes really bad! You can experiment with thickness and find your preference. If you want it thicker and chewier than spread your jammy mixture around 1cm thick. If you want it thin and tough like jerky (like mine) then spread your mixture around 0.5cm thick. As your fruit roll up dehydrates and loses its water content in the oven they will become much thinner so bare that in mind when spreading your fruit.
Check your strawberry fruit roll ups every hour to make sure they are not burning but expect to take your fruit leather to take around 3-4 hours in the oven. Once they are tacky but not sticky then they should be ready to remove from the oven.
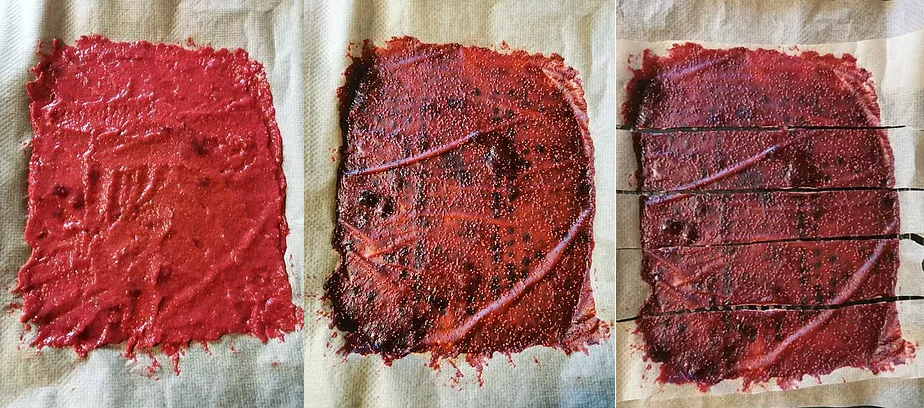
Leave the fruit roll ups on the baking paper and cut into strips before rolling.
I’ll be posting several variations of these fruit roll ups in time for summer. Such as orange, tropical fruits and mixed berry. If you enjoy them as much as me then keep an eye out for things to come!
Variations:
- Tropical Twist: Incorporate a mix of tropical fruits like mango or pineapple into the strawberry blend for a burst of exotic flavors.
- Minty Fresh Infusion: Add a teaspoon of finely chopped fresh mint to the strawberry mix for a refreshing twist.
FAQ:
Q: Can I use frozen strawberries for this recipe?
A: Absolutely! Just make sure to thaw them before blending to achieve the right consistency.
Q: Is there a way to make it sweeter without using sweetener?
A: Certainly! Adjust the sweetness naturally by using riper strawberries or adding a touch of agave syrup.
Q: How should I store these Strawberry Fruit Roll-Ups?
A: Keep them in an airtight container at room temperature for up to a week, or refrigerate for extended freshness.
Ready to savour the lusciousness of homemade Strawberry Fruit Roll-Ups? Share your delightful creations on Instagram and tag us @HealthyHeartyWholesome! 🍓🌟
Latest Posts:
- 10 Gluten Free Healthy Snack Recipes
- Healthy Orange Chicken | Chinese Fake-away Recipe
- Lettuce Wraps With Tuna Crunch Filling
- Healing Herbs – Heal Yourself With Food
- 10 Healthy Recipes For Spring
Please consider liking and following my Instagram and Facebook @ HealthyHeartyWholesome. Not only does it help you to stay up to date with all of these cool recipes but it helps support me, which means I can continue to bring you these super yummy healthy recipes for weight loss for FREE!

Strawberry Fruit Roll Ups
Ingredients
- 450 g fresh strawberries
- 1 tsp lemon juice
- 1 tsp sweetener optional
Instructions
- Blend strawberries with lemon juice and optional sweetener. If your blender is as small as mine you may want to do this in two lots. Make sure there are no more lumps. If you want to strain the seeds, do so now.450 g fresh strawberries, 1 tsp lemon juice, 1 tsp sweetener
- Transfer blended strawberries to a saucepan and heat on high stirring constantly, you don't want any to stick to the bottom of the pan or round the sides as these bits will over cook. once your your strawberries have thickened to the point where they are jammy and can be pushed aside to reveal the bottom of the pan for a few seconds you can take them off the heat.
- Line a baking tray with baking paper and spread your jam thinly and evenly over the paper referring to thickness guides above, if your jam is so thin you can see through to the paper then it will be too thin.
- Bake on 70°C or as low as your oven will go for 3-4 hours. When it is done you should be able to touch it without it feeling excessively sticky.
- Remove from the oven and cut into strips with scissors, leave about an inch of paper either end of your strips and roll up like shown in the photo.